These days it is hard to go to any mobile conference without hearing someone talking about the pending explosion of data traffic volume brought on by the dawn of the Internet video age. If you haven't tuned into the latest yet, GigaOM has a nice recap on the latest Cisco traffic study. Is there a correlation between this onslaught of data volume and mobile LBS? You bet. Read on.
A key issue in mobile LBS is location accuracy and positioning duration. Today, a mobile location is typically estimated from either GPS signals or cell towers. GPS is well suited for high-accuracy LBS applications such as car navigation. But the consumer applications of GPS have long been hindered by technology limitations such as long signal acquisition time and limited signal coverage. The recent boom of mobile LBS has largely been fueled by cell-based positioning technologies. Unlike GPS coverage, cell locations are not only much quicker to obtain but also 100% available both outdoors and indoors. The accuracy of a cell location depends on the cell size. The smaller the cell-size, the more accurate the cell-derived location. This where the looming data explosion will benefit LBS.
A two-part series, titled "The Network Paradox: Meeting the Mobile Data Demand", quoted industry sources as saying that the only way to increase mobile data capacity by more than 9X is to deploy 4 or more times of cell sites. These new cell sites will lead to at least 2 times reduction of the overall cell size according to cellular traffic engineering rules.
So, mobile LBS will see its better days ahead.
Friday, December 3, 2010
A Gotcha Moment with the View Attribute android:id
When editing layout xml files using Google's Eclipse plugin, the plugin is usually smart enough to flag typos when they cause code generation problems. However, errors that slip through the plugin undetected can cause nasty bugs at run-time. One such error involves the use of the attribute android:id. Usually, an id should be specified like this:
<!-- Correct Syntax -->
<Button android:id="@+id/abutton" />
But the following XML will compile fine without any error:
<!-- Incorrect Syntax -->
<Button id="@+id/xbutton" />
Android will even draw the button on the screen. The gotcha moment comes when you try to lookup this button in the view on a newer (such as Android 2.1) emulator/device:
Button aButton = (Button) thisView.findViewbyId(R.id.xbutton);
The aButton variable will be null after this call! What makes this a particularly hideous bug is that it was actually valid pre-Android 1.6! So apparently, the plug-in and the compiler are made backward compatible to allow the old syntax but not the run-time. Welcome to the bleeding edge...
Tuesday, November 23, 2010
Activity Result: The Secret of Passing Information From a Child to a Parent
When an Activity closes or "stops" in Android, how do we pass information back to the parent that started this Activity? The trick is to use Activity Result following this 3-step design pattern:
Step 1: In the parent activity, start the child activity with startActivityForResult()
Step 2: In the parent activity, override onActivityResult():
onStop() --> onActivityResult() --> onRestart() --> onStart() --> onResume()
Here, a good design pattern for processing data passed from the child is to delay processing to after onStart() by handing off the data to a Handler.
Step 3: In the child activity, override finish():
That's it. Happy hacking!
* Updated on December 01, 2010.
Step 1: In the parent activity, start the child activity with startActivityForResult()
public class Parent extends Activity {
   private final void startChildOnClick() {
      Intent intent = new Intent(this, Child.class);
      intent.setAction(MyConstants.ACTION_START_CHILD);
      intent.putExtra("Parent Uid", Process.myUid());
      startActivityForResult(intent, 10);
   }
}
Step 2: In the parent activity, override onActivityResult():
public class Parent extends Activity {
   private final void startChildOnClick() {
      Intent intent = new Intent(this, Child.class);
      intent.setAction(MyConstants.ACTION_START_CHILD);
      intent.putExtra("Parent Uid", Process.myUid());
      startActivityForResult(intent, 10);
   }

   @Override
   protected final void onActivityResult(final int requestCode,
                                         final int resultCode,
                                         final Intent data) {
      // !!! Called before onRestart() if the parent was
      // not destroyed!!!
      super.onActivityResult(requestCode, resultCode, data);
      if (requestCode == 10 && resultCode == 20) {
         if (data != null) {
            int cUid = data.getString("Child Uid");
            // Be careful to when to use the data passed
            // from child
         }
      }
   }
}
It is very important to understand when onActivityResult() is called in the Activity lifecyle. If the parent activity was not destroyed before it is brought back to the foreground again, the calling sequence will be:onStop() --> onActivityResult() --> onRestart() --> onStart() --> onResume()
Here, a good design pattern for processing data passed from the child is to delay processing to after onStart() by handing off the data to a Handler.
Step 3: In the child activity, override finish():
public class Child extends Activity {
   @Override
   public final void finish() {
      Intent intent = new intent(this, Parent.class);
      intent.putExtra("Child Uid", Process.myUid());
      // Android will pass the result set here to the parent
      setResult(20, intent);
      super.finish(); // Must be called last!!
   }
}
Note that the child must call call super.finish() as the very last statement in the block.
That's it. Happy hacking!
* Updated on December 01, 2010.
Tuesday, November 2, 2010
Service Binding Workaround in Tab Activity
Calling bindService() from an embedded tab activity can generate an error like this:
W/ActivityManager( 61): Binding with unknown activity: android.os.BinderProxy@43f4a2d0
A quick googling turned up two bug reports on this problem:
http://code.google.com/p/android/issues/detail?id=2665
http://code.google.com/p/android/issues/detail?id=2483
Apparently, bindService() can not be performed from inside an embedded activity such as a Tab. There are three workarounds:
Updated on November 6, 2010:
Because a service connection is context specific, the workaround #1 and #2 can have unintended threading consequences when you use TabActivity and TabHost to manage embedded tabs. For example, when getApplicationContext().bindService() is used, the ServiceConnection.onServiceConnected() will be called from a thread different from the thread running the current tab. Therefore, access to the service object must be synchronized. This is demonstrated below:
W/ActivityManager( 61): Binding with unknown activity: android.os.BinderProxy@43f4a2d0
A quick googling turned up two bug reports on this problem:
http://code.google.com/p/android/issues/detail?id=2665
http://code.google.com/p/android/issues/detail?id=2483
Apparently, bindService() can not be performed from inside an embedded activity such as a Tab. There are three workarounds:
- Call getParent().bindService()
- Call getApplicationContext().bindService()
- Call bindService() in the TabHost activity and then passes the binder to other tabs.
Updated on November 6, 2010:
Because a service connection is context specific, the workaround #1 and #2 can have unintended threading consequences when you use TabActivity and TabHost to manage embedded tabs. For example, when getApplicationContext().bindService() is used, the ServiceConnection.onServiceConnected() will be called from a thread different from the thread running the current tab. Therefore, access to the service object must be synchronized. This is demonstrated below:
public class MyTab extends Activity {
   private static final TAG = MyTab.this.getName();
   private RemoteService remoteService = null;

   @Override
   protected void onCreate(Bundle savedInstanceState) {
       super.onCreate(savedInstanceState);
       if (getApplicationContext().bindService()) {
          // Unsynchronized access!!
          Log.v(TAG, "Service bound ? " + remoteService != null ? "true" : "false";
       }
   }

   private class MyServiceConnection implements ServiceConnection {
      @Override
      public void onServiceConnected (final ComponentName name,
                                      final IBinder service) {
         // Unsynchronized access!!
         remoteService = RemoteService.stub.asInterface(service);
      }

      @Override
      public void onServiceDisconnected (final ComponentName name)
      {
         // Unsynchronized access!!
         remoteService = null;
      }
   }
}
A straight-forward way to fix the synchronization problem is to introduce a lock variable:
public class MyTab extends Activity {
   private static final TAG = MyTab.this.getName();
   private RemoteService remoteService = null;
   private final Object() lock = new Object();

   @Override
   protected void onCreate(Bundle savedInstanceState) {
       super.onCreate(savedInstanceState);
       if (getApplicationContext().bindService()) {
          // Synchronized access
          synchroized (lock) {
             try {
                while (remoteService == null) {
                   lock.wait();
                }
             } catch (InterruptedException e) {
                // Recheck condition
             }
          }
          Log.v(TAG, "Service bound ? " + remoteService != null ? "true" : "false";
       }
   }

   private class MyServiceConnection implements ServiceConnection {
      @Override
      public void onServiceConnected (final ComponentName name,
                                      final IBinder service) {
         // Synchronized access
         synchronized (lock) {
            remoteService = RemoteService.stub.asInterface(service);
            lock.notifyAll();
         }
      }

      @Override
      public void onServiceDisconnected (final ComponentName name)
      {
         // Synchronized access
         synchronized (lock) {
            remoteService = null;
            lock.notifyAll();
         }
      }
   }
}
But we are not all done yet. We must use the same lock variable to pretect EVERY read/write access to the remoteService variable in this class. Why? Because the ServiceConnection.onServiceDisconnected() may be called from the main looper thread when the process hosting the background service has terminated or stopped unexpectedly. This can happen even though a service would normally be kept alive as long as there is a binding to it. Therefore, we need to surround every access to the remoteService variable with a lock to pretect ourself from reading stale object reference.
Wednesday, October 20, 2010
Where Does Android Gets Its Traffic Stats?
Quite simple. Android get these stats from Linux sysfs and proc file systems. They can be found at the following locations on a Android powered device:
| Android TrafficStats | Linux File Location |
|---|---|
| getMobileTxPackets() | /sys/class/net/rmnet0/statistics/tx_packets |
| /sys/class/net/ppp0/statistics/tx_packets | |
| getMobileRxPackets() | /sys/class/net/rmnet0/statistics/rx_packets |
| /sys/class/net/ppp0/statistics/rx_packets | |
| getMobileTxBytes() | /sys/class/net/rmnet0/statistics/tx_bytes |
| /sys/class/net/ppp0/statistics/tx_bytes | |
| getMobileRxBytes() | /sys/class/net/rmnet0/statistics/rx_bytes |
| /sys/class/net/ppp0/statistics/rx_bytes | |
| getTotalTxPackets() | Add up tx_packets for all interfaces under /sys/class/net |
| getTotalRxPackets() | Add up rx_packets for all interfaces under /sys/class/net |
| getTotalTxBytes() | Add up tx_bytes for all interfaces under /sys/class/net |
| getTotalRxBytes() | Add up rx_bytes for all interfaces under /sys/class/net |
| getUidRxBytes() | /proc/uid_stat/[uid]/tcp_rcv |
| getUidTxBytes() | /proc/uid_stat/[uid]/tcp_snd |
Inconsistent Life-cycle Events in Andorid Service API
Google Android engineers should read the API design guideline from one of their own. The callback methods on the Service class violates the basic consistency principle in good API design. Here is what the SDK doc says about the two callback methods:
But wait:
So, the life-cycle events on Service creation do not occur in a consistent way! No explanation was given. Sigh...
"If someone calls
Context.startService() then the system will retrieve the service (creating it and calling its onCreate() method if needed) and then call its onStartCommand(Intent, int, int) method with the arguments supplied by the client."But wait:
"Clients can also use
Context.bindService() to obtain a persistent connection to a service. This likewise creates the service if it is not already running (calling onCreate() while doing so), but does not call onStartCommand()."So, the life-cycle events on Service creation do not occur in a consistent way! No explanation was given. Sigh...
Wednesday, September 29, 2010
Creating Loadable Kernel Modules for Android
The Loadable Kernel Module architecture in Linux allows a developer to extend the functionality of a pre-built Linux operating system. We can use this mechanism to extend Android because Linux kernel is the base operating system for all Android devices. The Linux Kernel Module Programming Guide is the pre-requisite reading before you embark on this journey. We will use the "Hello World" example from that guide to explain the process of compiling and loading an external Kernel module for Android Emulator. These basic steps are the foundation for creating custom Android functionality for real-world devices.
The latest Android 2.2 Emulator from the Android SDK does not support loadable kernel modules. Therefore, the first order of business is to compile a new kernel for the emulator that allows dynamic kernel module loading.
Prepare the Build Enviornment
The easiest way to compile a Linux kernel for Android is to use build scripts from Android itself. Refer to my previous blog on how to check out a Android platform build. From the root of the platform source tree, run:
Check-out the Kernel Source For the Emulator
Change to a new directory and check out the Linux kernel source for the Emulator. Note that we must check out the version that matches our emulator because of Linux kernel compatibility rules. See the Guide for details. In this example, we use the Android 2.2 emulator from the official SDK. This emulator uses kernel version 2.6.29. You can find this version number in Settings or from /proc/version in the adb shell.
Configure the Kernel Source
The easiest method to configure the kernel source is to use the configuration from a running emulator:
Now edit the .config file and enable the kernel module feature:
CONFIG_MODULES=y
Save the file and proceed to build:
Now we have a new kernel that we can use to load our kernel modules.
Compile External Kernel Modules
Create a new directory outside the kernel source tree. Then create a hello-3.c file and copy-n-paste the source code from the Guide. Next, create a Makefile to use our own kernel source tree:
obj-m += hello-3.o
all:
make -C $(KERNELSRC) M=$(PWD) modules
clean:
make -C $(KERNELSRC) M=$(PWD) clean
Then run make:
It will create a "hello-3.ko" file after completion. This is the kernel module that we will use on our Android. If the kernel source was not configured with "CONFIG_MODULES=y", the compiler would usually throw up an error like this:
Store the Kernel Module onto Android
We first need to use the Android SDK to create an AVD. In this example, we set the target of the AVD to 2.2. We then start this AVD with the emulator pointing to our newly built kernel:
$ emulator -kernel /mydroid/kernel/arch/arm/boot/zImage -avd myavd
We can store our kernel module anywhere that is writeable on Android. No need to "repack" the system image as some on the web has suggested. The system image from the SDK is not writeable so we will put our file on the user data partition, which is always writeable.
Load the Kernel Module
Run the insmod command in the adb shell mode to load our module:
If there is no error, you can verify the new module using the lsmod command:
# lsmod
hello_3 1004 0 - Live 0xbf000000 (P)
You can also verify the module output in kmsg:
# cat /proc/kmsg
<4>hello_3: module license 'unspecified' taints kernel.
<6>Hello, world 3
Congratulations! You are now an Android kernel programmer. Use your power wisely.
The latest Android 2.2 Emulator from the Android SDK does not support loadable kernel modules. Therefore, the first order of business is to compile a new kernel for the emulator that allows dynamic kernel module loading.
Prepare the Build Enviornment
The easiest way to compile a Linux kernel for Android is to use build scripts from Android itself. Refer to my previous blog on how to check out a Android platform build. From the root of the platform source tree, run:
$. build/envsetup.sh
$lunch 1
Check-out the Kernel Source For the Emulator
Change to a new directory and check out the Linux kernel source for the Emulator. Note that we must check out the version that matches our emulator because of Linux kernel compatibility rules. See the Guide for details. In this example, we use the Android 2.2 emulator from the official SDK. This emulator uses kernel version 2.6.29. You can find this version number in Settings or from /proc/version in the adb shell.
$ git clone git://android.git.kernel.org/kernel/msm.git .
$ git checkout --track -b my-goldfish-2.6.29 remotes/origin/android-goldfish-2.6.29
Configure the Kernel Source
The easiest method to configure the kernel source is to use the configuration from a running emulator:
$ adb pull /proc/config.gz
$ gunzip config.gz
$ mv config .config
Now edit the .config file and enable the kernel module feature:
CONFIG_MODULES=y
Save the file and proceed to build:
$ export ARCH=arm
$ export CROSS_COMPILE=arm-eabi-
$ make
Now we have a new kernel that we can use to load our kernel modules.
Compile External Kernel Modules
Create a new directory outside the kernel source tree. Then create a hello-3.c file and copy-n-paste the source code from the Guide. Next, create a Makefile to use our own kernel source tree:
KERNELSRC=/mydroid/kernel
all:
make -C $(KERNELSRC) M=$(PWD) modules
clean:
make -C $(KERNELSRC) M=$(PWD) clean
Then run make:
$ make
It will create a "hello-3.ko" file after completion. This is the kernel module that we will use on our Android. If the kernel source was not configured with "CONFIG_MODULES=y", the compiler would usually throw up an error like this:
error: variable '__this_module' has initializer but incomplete type
Store the Kernel Module onto Android
We first need to use the Android SDK to create an AVD. In this example, we set the target of the AVD to 2.2. We then start this AVD with the emulator pointing to our newly built kernel:
$ emulator -kernel /mydroid/kernel/arch/arm/boot/zImage -avd myavd
We can store our kernel module anywhere that is writeable on Android. No need to "repack" the system image as some on the web has suggested. The system image from the SDK is not writeable so we will put our file on the user data partition, which is always writeable.
$ adb push /mymodule/hello-3.ko /data/hello-3.ko
Load the Kernel Module
Run the insmod command in the adb shell mode to load our module:
# cd /data
# insmod hello-3.ko
If there is no error, you can verify the new module using the lsmod command:
# lsmod
hello_3 1004 0 - Live 0xbf000000 (P)
You can also verify the module output in kmsg:
# cat /proc/kmsg
<4>hello_3: module license 'unspecified' taints kernel.
<6>Hello, world 3
Congratulations! You are now an Android kernel programmer. Use your power wisely.
Tuesday, September 21, 2010
Message Object Pooling in Android
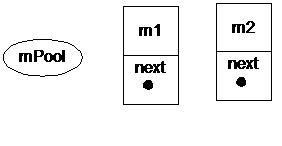
The Message object pool in Android is implemented as an unbounded singly linked list. We will illustrate the pooling process with the creation and reclamation of two Message objects.
Initially, there is no Message object in the system. The mPool object, which is the head of the linked list, references to nothing (i.e. is null):


Initially, there is no Message object in the system. The mPool object, which is the head of the linked list, references to nothing (i.e. is null):

Now, we make the following two calls:
Message m1 = Message.obtain();
Message m2 = Message.obtain();
Since the linked-list pointed to by mPool is empty, Android will create two disjoint Message objects. There is no linkage between them and the head.

Now, we send these two messages to a handler:
Handler h = new Handler() {
@Override
public final void handleMessage(final Message message) {
// Do nothing.
}
};
m1.setTarget(h);
m2.setTarget(h);
h.sendMessage(m1);
h.sendMessage(m2);
The Looper in the handler h will dispatch the two messages in the order of m1 and m2. The dispatch sequence also determines the message reclamation sequence. The Looper will call Message.recycle() on m1 and m2 after Handler.handleMessage() completes. Each recycled Message object will be inserted to the head of the list. So after m1.recycle() is called, the linked list becomes:

Note that the list now has just one element m1. m2 is still dangling somewhere in the memory. Android will call m2.recycle() after m2 is handled. This inserts m2 into the head of the linked list:

Note that m2 and m1 will not be garbaged collected because mPool is a static reference. If the linked list is not empty, a call to Message.obtain() will remove the head of the list and return that Message object to the caller. In other words, no new object is created as long as the linked list has at least one unused Message object. This design exhibits Locality of Reference. The mostly recently used Message object is also re-used first.
Wednesday, September 8, 2010
Step-to-Step Guide to Programming Android SSL with Self-Signed Server Certificate
There is a dearth of SDK documentation on how to work with SSL connections on Android with self-signed certificate. Here is a method that stores a self-signed certificate in the application resource and then later uses that certificate for SSL connections.
1. We create a self-signed server certificate for our SSL server:
2. We export the certificate to a file:
3. Since Android uses the JCE provider from Bouncy Castle, we download the provider jar bcprov-jdk16-145.jar from BC and store it at C:\androidproject\libs.
4. Now, we import the server certificate to our Android project as a raw resource:
If you use the Eclipse ADK, the ADK will automatically create a resource id ssltestcert after you refresh the project.
5. We can now use the server certificate in our Java program:
Congratulations! You can now use your self-signed server certificate for SSL communication.
1. We create a self-signed server certificate for our SSL server:
keytool -genkey -dname "cn=ssltest, ou=test, o=example, c=US"
   -alias ssltest -keypass ssltest -keystore c:\test\ssltest.keystore
   -storepass ssltest -validity 180
2. We export the certificate to a file:
keytool -export -alias ssltest -keystore c:\test\ssltest.keystore
   -file c:\test\ssltest.cer -storepass ssltest -keypass ssltest
3. Since Android uses the JCE provider from Bouncy Castle, we download the provider jar bcprov-jdk16-145.jar from BC and store it at C:\androidproject\libs.
4. Now, we import the server certificate to our Android project as a raw resource:
keytool -import -alias ssltestcert -file C:\test\ssltest.cer
   -keypass ssltestcert -keystore C:\androidproject\res\raw\ssltestcert
   -storetype BKS -storepass ssltestcert
   -providerClass org.bouncycastle.jce.provider.BouncyCastleProvider
   -providerpath c:\androidproject\libs\bcprov-jdk16-145.jar
Note that we give it a store type BKS.
If you use the Eclipse ADK, the ADK will automatically create a resource id ssltestcert after you refresh the project.
5. We can now use the server certificate in our Java program:
// Load the self-signed server certificate
char[] passphrase = "ssltestcert".toCharArray();
KeyStore ksTrust = KeyStore.getInstance("BKS");
ksTrust.load(context.getResources().openRawResource(R.raw.ssltestcert),
             passphrase);
TrustManagerFactory tmf = TrustManagerFactory.getInstance(KeyManagerFactory.getDefaultAlgorithm());
tmf.init(ksTrust);

// Create a SSLContext with the certificate
SSLContext sslContext = SSLContext.getInstance("TLS");
sslContext.init(null, tmf.getTrustManagers(), new SecureRandom());

// Create a HTTPS connection
URL url = new URL("https", "10.0.2.2", 8443, "/ssltest");
HttpsURLConnection conn = (HttpsURLConnection) url.openConnection();

/* Uncomment the following line of code if you want to skip SSL */
/* hostname verification.  But it should only be done for testing. */
/* See http://randomizedsort.blogspot.com/2010/09/programmatically-disabling-java-ssl.html */
/* conn.setHostnameVerifier(new NullVerifier()); */

conn.setSSLSocketFactory(sslContext.getSocketFactory());
Congratulations! You can now use your self-signed server certificate for SSL communication.
Programmatically Disabling Java SSL Certificate Check for Testing
Continuous integration testing with Java SSL code is prone to certificate mismatch problems. Sometimes valuable development time can be saved by disabling just the certificate verification logic in the SSL client while preserving all other security logics. This technique is particularly useful for testing with a self-signed certificate because it eliminates the need to install the certificate on every client machine or device that needs to communicate with the SSL server. It is perfectly safe in a well-controlled development environment.
First, we create stub implementations of HostnameVerifier and X509TrustManager.
Then, we install our stub implementations to the SSL connection.
First, we create stub implementations of HostnameVerifier and X509TrustManager.
public static class NullVerifier implements HostnameVerifier {
      @Override
      public final boolean verify(final String hostname,
                                  final SSLSession sslSession) {
         return true;
      }

   }

   public static class NullTrustManager implements X509TrustManager {
      @Override
      public void checkClientTrusted(final X509Certificate[] chain,
                                     final String authType)
         throws CertificateException {
      }

      @Override
      public void checkServerTrusted(final X509Certificate[] chain,
                                     final String authType)
         throws CertificateException {
      }

      @Override
      public final X509Certificate[] getAcceptedIssuers() {
         return new X509Certificate[] {};
      }
Then, we install our stub implementations to the SSL connection.
      // Configure SSL Context
      SSLContext sslContext = SSLContext.getInstance("TLS");
      X509TrustManager nullTrustManager = new NullTrustManager();
      TrustManager[] nullTrustManagers = {nullTrustManager};
      sslContext.init(null, nullTrustManagers, new SecureRandom());

      // Create HTTPS connection
      URL url = new URL("https", "127.0.0.1", 8443, "/ssltest");
      HttpsURLConnection conn = (HttpsURLConnection) url.openConnection();
      conn.setHostnameVerifier(new NullVerifier());
      conn.setSSLSocketFactory(sslContext.getSocketFactory());
Configure Jetty Maven Plugin for SSL
Documentation on Jetty Maven Plugin from Eclipse Foundation is not as complete as its predecessor from Codehaus. Here is a sample pom.xml for configuring the plugin for SSL. The highlighted section is the configuration of a SSL connector.
<build>
  <plugins>
    <plugin>
      <groupid>org.mortbay.jetty</groupid>
      <artifactid>jetty-maven-plugin</artifactid>
      <version>7.0.2.v20100331</version>
      <configuration>
        <connectors>
          <connector implementation="org.eclipse.jetty.server.nio.SelectChannelConnector">
           <port>8080</port>
           <maxidletime>60000</maxidletime>
          </connector>
          <connector implementation="org.eclipse.jetty.server.ssl.SslSelectChannelConnector">
           <port>8443</port>
           <maxidletime>60000</maxidletime>
           <keystore>${basedir}/ssl/server.keystore</keystore>
           <password>sample</password>
           <keypassword>sample</keypassword>
          </connector>
         </connectors>
      </configuration>
     </plugin>
   </plugins>
</build>
Wednesday, September 1, 2010
Will GloPos dethrone GPS?
I don't know why GloPos wants to stake its claims against GPS. But the short answer to the question in the title is: unlikely. I will give 4 reasons here:
- Wireless emergency services can not use GloPos. Wireless operators worldwide however must deploy control plane positioning technology and/or GPS to support positioning during emergency calls.
- User plane positioning technology has converged on the SUPL standard. SUPL enabled handsets and location servers have been commercially available since 2008. Almost every A-GPS capable smartphone on the market today is equipped with a SUPL stack. A SUPL server is capable of network-based positioning based on single-cell and multi-cell NMR (Network Measurement Report), which is the same principled technology used by GloPos. When both wireless operators and OEMs world-wide are investing in SUPL, GloPos will have a tough time to market a competing technology.
- NMR positioning is not new. TruePosition and Cambridge Positioning Systems were two of the early marketers of this technology 10 years ago. Their accuracy, confidence and deployment cost claims are even better than those from GloPos if you simply compare their marketing brochures. GloPos however has not provided any driving test results.
- GloPos data cost is too high. Each positioning session in GloPos requires at least 100Kb data to be transferred, according to this article. In-car navigation needs a typical 5-second refresh rate. Thus a 30-minute drive will generate over 4.3MB of data traffic just for positioning alone!
Tuesday, August 31, 2010
Building Android and Linux Kernel for Nexus One
System Requirements
Google's Android build system only supports Linux (Ubuntu) and Mac OS. Examples below all use Ubuntu. The two most important tools from the Android SDK are "adb" and "fastboot". But "fastboot" is not available in the Linux distribution of the SDK. We will build it from the source.For the Impatient
If you already know everything, you can find required steps for Nexus One in summary from this thread. But your mileage may vary.Compiling Android Platform
VCS
Google uses Git to as the VCS for both Android and its own Linux kernel. Their source is published on Git web at http://android.git.kernel.org/.Here are a couple of Git tutorials for CVS users:
Google publishes its repo tool for managing Android source. Repo does not seem to work on the Linux Kernel source tree though.
Checking-out Source
1. Create two separate directories to hold Andorid platform and its Linux kernel source trees:laptop-2:~/myandroid$ ls kernel platform2. Next, change to the platform directory and and initialize the repo.
$ cd platform
$HOME repo init -u git://android.git.kernel.org/platform/manifest.git -b froyo
The branch name "froyo" can be found on the git web at:
http://android.git.kernel.org/?p=platform/manifest.git;a=summary
Remote branch names can be found in the "heads" section on that web page.
3. Sync with the source.
$HOME repo syncThis makes "~/myandroid/platform" the root of the platform source tree. We will use "platform" for short in the following examples.
Building
1. Set up the build environment from the root of the source tree as the following:$ . build/envsetup.sh2. If building a phone-specific Android, then build adb first. Otherwise, skip to step six. But note that you can only build a generic Android if you skip device steps. If you flash a generic Android image to your phone, your phone will not even get a radio signal. Nor will you be able to use any buttons on the device. So skip this step only if you just want to play with the emulator.
At the root of the source tree:
$ make adb3. Make adb available on the path.
$ export $HOME/myandroid/platform/out/host/linux-x86/bin:$PATH
$ which adb
$HOME/myandroid/platform/out/host/linux-x86/bin/adb
4. We need to extract device specific files from Nexus One. Connect the phone to the laptop using the USB cable. The phone needs to be powered on. If the phone has not been set to USB debugging. Set it at:
-
- Settings --> Applications --> Development --> USB debugging
/out/host/linux-x86/bin$ sudo ./adb devices
[sudo] password for userone:
* daemon not running. starting it now *
* daemon started successfully *
List of devices attached
HTXXXXXXXXX device
5. Google Nexus One is HTC Passion. So we now run the Passion-specific extraction script under the "device/htc/passion" directory.
Note that the device files must be extracted from a Android device that matches to your build. Here we extract from a Nexus One with 2.2 update because we are going to build the Froyo branch of the code.
$ cd device/htc/passion
/device/htc/passion$./extract-files.sh
Note that adb must be on the path in order for the extraction script to succeed. The extraction script will pull HTC proprietary files from the device and store them under "vendor/htc/passion".
/vendor/htc/passion/proprietary$ ls
01_qcomm_omx.cfg        libEGL_adreno200.so        libOmxVdec.so
AdieHWCodecSetting.csv  libGLESv1_CM_adreno200.so  libOmxVidEnc.so
akmd                    libGLESv2_adreno200.so     libopencorehw.so
AudioBTID.csv           libgps.so                  libq3dtools_adreno200.so
bcm4329.hcd             libgsl.so                  libqcomm_omx.so
default.acdb            libhtc_acoustic.so         libstagefrighthw.so
default_att.acdb        libhtc_ril.so              mm-venc-omx-test
default_france.acdb     liblvmxipc.so              parse_radio_log
fw_bcm4329_apsta.bin    libmm-omxcore.so           vpimg
fw_bcm4329.bin          liboemcamera.so            yamato_pfp.fw
libcamera.so            libOmxCore.so              yamato_pm4.fw
6. Change back to the root of the source tree and use "lunch" to set up appropriate build environment variables.
$ lunch

You're building on Linux

Lunch menu... pick a combo:
     1. generic-eng
     2. simulator
     3. full_dream-userdebug
     4. full_passion-userdebug
     5. full_sapphire-userdebug

Which would you like? [generic-eng] 4
The "generic-eng" build option will allow you to build an Android that is not device specific. But then you can't really use a generic Android image on a real phone because the generic image does not know how to use device-specific features such as buttons and camera. Nor can the generic image read radio signals. Therefore, the generic-eng build is only useful for emulator purpose. The main difference between generic-eng and userdebug is if the file system is read-write or read-only by default. We will select "full_passion-user-debug" here because we want to flash our images to the device.7. Build the Android platform from the root of the source tree.
$ makeNote: When building "full_passion-userdebug" the first time, I hit a compiler error on "librpc.so not found" which caused references in HTC's proprietary libgps to fail compiling. After googling a solution, I found the following workaround:
$ mm librpc
$ make
Do not run "make clean" when performing the two steps above. I have since checked out the froyo branch many times and have never encountered this problem again.
8. Inspect build output.
The build artifacts are located under the out subdirectory.
$ ls out
casecheck.txt  CaseCheck.txt  debug  host  target  tmp  versions_checked.mk
The Android tools for Linux/X86 are located under "host". The device images are under "target".
Compiling Linux Kernel for ARM
Checking-out SourceI used Git instead of Google's repo for kernel building.
1. Clone the MSM family of the kernel tree from the Android Git to a working directory. As of July 2010, all HTC Android phones use Qualcomm's MSM family of the CDMA/GSM/UMTS chipsets. Nexus One is no exception.
userone@userone-laptop-2:~/myandroid/kernel$ git clone git://android.git.kernel.org/kernel/msm.git .If building the emulator kernel, use "git://android.git.kernel.org/kernel/common.git" instead. 2. Check out the latest 2.6.32 kernel branch for Nexus One.
userone@userone-laptop-2:~/myandroid/kernel$ git checkout --track -b userone-msm-2.6.32-nexusonec remotes/origin/android-msm-2.6.32-nexusonecWhen the check out is done, you can use git to verify the branch info.
userone@userone-laptop-2:~/myandroid/kernel$ git branch -a
  android-msm-2.6.27
  userone-msm-2.6.32
* userone-msm-2.6.32-nexusonec
  remotes/origin/HEAD -> origin/android-msm-2.6.27
  remotes/origin/android-msm-2.6.25
  remotes/origin/android-msm-2.6.27
  remotes/origin/android-msm-2.6.29
  remotes/origin/android-msm-2.6.29-donut
  remotes/origin/android-msm-2.6.29-nexusone
  remotes/origin/android-msm-2.6.32
  remotes/origin/android-msm-2.6.32-nexusonec
  remotes/origin/android-msm-htc-2.6.25
  remotes/origin/android-msm8k-2.6.29
  remotes/origin/msm-2.6.25
The root of the kernel tree is now "userone@userone-laptop-2:~/myandroid/kernel".
Building
1. Setup the build environment using the "build/envsetup.sh" script as shown in the platform build. This sets up important cross compiling environment variables for ARM build.2. Set up environment variables for cross compiling.
$ export ARCH=arm
$ CROSS_COMPILE=arm-eabi-
3. Pull the kernel configuration from the device and then build the source. This step is the same for building a kernel for Android emulator.
$ adb pull /proc/config.gz
$ gunzip config.gz
$ mv config .config
$ make
The arm target can be found under ..kernel/arch/arm/boot.
$ ls arch/arm/boot
bootp  compressed  Image  install.sh  Makefile  zImage
The newly built kernel is "zImage".
4. Change to root of the Android platform tree and build the new Android with the new kernel.
$ rm -rf out
$ make -j4 TARGET_PREBUILT_KERNEL=$HOME/myandroid/kernel/arch/arm/boot/zImage
The TARGET_PREBUILT_KERNEL will instruct the Android build system to use our custom-built kernel.
Flash Android Image to the Device
Warning!! Flashing images will erase all your user data on the phone!Warning!! Attempting this at your own Risk!! Your phone will be bricked!!
Warning!! Always have factory images handy so you can recover in case of bricked phones!
An unlocked bootloader allows flashing custom images to an Anroid Phone. Android Dev Phone 1 and 2 ship with unlocked bootloaders. But the bootloader on Nexus One needs to be unlocked first.
Both adb and fastboot can write files to the device. I use fastboot for flashing images:
Unlock the Bootloader in Nexus Onefrom the (#References):
# Reboot phone into fastboot: Power off device and hold down trackball while powering back on. (The fastboot screen is the one with the Androids on skateboards)
   # Open a command prompt and navigate to your Android SDK tools folder.
   # Type ‘fastboot devices‘ to make sure your phone is recognized.
   # Type ‘fastboot oem unlock‘ to unlock the bootloader.
   # Use volume keys to navigate to yes and press the power button to confirm.
Flash Android Images to Nexus One
We now flash android images that we just built to the device.$ sudo $HOME/myandroid/platform/out/host/linux-x86/bin/fastboot -p passion -w flashall
[sudo] password for userone:
< waiting for device >
--------------------------------------------
Bootloader Version...: 0.33.0012
Baseband Version.....: 4.06.00.12_7
Serial Number........: HTXXXXXXXXX
--------------------------------------------
checking mid... OKAY [ 0.003s]
checking product... OKAY [ 0.009s]
checking version-bootloader... OKAY [ 0.002s]
checking version-microp... OKAY [ 0.004s]
checking version-baseband... OKAY [ 0.012s]
sending 'boot' (2336 KB)... OKAY [ 0.366s]
writing 'boot'... OKAY [ 0.917s]
sending 'recovery' (2562 KB)... OKAY [ 0.405s]
writing 'recovery'... OKAY [ 1.048s]
sending 'system' (75301 KB)... OKAY [ 10.943s]
writing 'system'... OKAY [ 25.634s]
erasing 'userdata'... FAILED (remote: not allowed)
finished. total time: 39.418s
The error about failing to erase userdata is because we selected user build (i.e. "userdebug") when building android. We can flash it manually:$ sudo $HOME/myandroid/platform/out/host/linux-x86/bin/fastboot flash userdata $HOME/myandroid/platform/out/target/product/passion/userdata.img
sending 'userdata' (2 KB)... OKAY [ 0.022s]
writing 'userdata'... OKAY [ 4.872s]
finished. total time: 4.894s
If the phone hangs after rebooting, we can restore it back to factory images.Restore Nexus One to Factory Settings
1. Download HTC Nexus One images from HTC Dev Center. HTC currently only provides Android 2.1 images for Nexus One. You can use your Google account to get the official 2.2 OTA update after restoring the phone to factory images.2. Unzip images to a directory.
userone@userone-laptop-2:~/Downloads/nexusone$ ls
android-info.txt  NexusOne_ERE36B_TMOUS.zip  system.img
boot.img          recovery.img               userdata.img
3. Flash all images to the device using fastboot.
This is the method I used to restore my Nexus One to factory settings.
$ sudo $HOME/myandroid/platform/out/host/linux-x86/bin/fastboot flash boot ./boot.img
$ sudo $HOME/myandroid/platform/out/host/linux-x86/bin/fastboot flash recovery ./recovery.img
$ sudo $HOME/myandroid/platform/out/host/linux-x86/bin/fastboot flash system ./system.img
$ sudo $HOME/myandroid/platform/out/host/linux-x86/bin/fastboot flash userdata ./userdata.img
I did not use "fastboot -w flashall" and "fastboot update [some].zip" because they complained about missing files.
Tips
- Use adb to boot the device into the recovery mode.
$ adb reboot recovery
- Use adb to store recovery image.
$ adb push <recovery-image-package>.zip /sdcard/update.zip
- Boot into the Nexus One recovery console.
-
- After selecting "recovery" from the fastboot screen on Nexus One, a screen will show up with a little android and a caution sign. Press "Volume Up" and the "power" button at the same time to go into the recovery console.
- Test kernel boot without flashing. Very useful in determining if a new kernel image can boot.
$ sudo fastboot boot arc/arm/boot/zImage
- Pull kernel compiling option from an existing phone.
$ adb pull /proc/config.gz
References
- Getting Anroid Source
- Android Build System
- Building AOSP for the Nexus One
- Compile Android kernel from the source
- Fedora ARM/HowToQemu
- Kernel Hackers' Guide to git
- HTC Android Dev Phone 1
- Video: How to Unlock and Root a Nexus One
- HTC Kernel Source and Binaries
- Motorola Kernel Source
- How to: Rooting your Nexus One - a definitive guide to what’s involved
- Android Fastboot
- MSM/QSD Android Enablement Project
- Android Boot Process from Power-on
- How to Build the LINUX KERNEL for the ANDROID EMULATOR (Eclair version)
- Download and Build the Google Android
- Anroid Porting on Real Target
- OpenBinder
- Technote android-2.6.31-001: How to regenerate bionic/libc/common/kernel headers for linux kernel v2.6.31
- How to dump boot message without adb
Subscribe to:
Posts (Atom)